Monday, November 26, 2012

Chocolate soufflé with custard/vanilla ice cream

I am not sure if I've ever tried a soufflé before but after eating a chocolate soufflé today, I've officially fallen in love with it! It felt like I was having a hot chocolate mousse. 

Very light. Very simple. Very fast to make. You can also make it advance, pop into the fridge until it's time to serve dessert! Of course, you need to give yourself about 15-20 minutes to bake the soufflé. It's dead simple,I promise. Requires only a few ingredients. And Taa daaa you've made a restaurant dessert! :)
The chocolate souffle sunk a little, so excuse the not to high soufflé. 
I got exactly 7 soufflés from the recipe.


  • 340g good quality chocolate,I used half milk and half dark Callebaut chocolate,chopped
  • 1/2 cup heavy whipping cream
  • 2 large egg yolks
  • 210g (about 7 large egg whites) egg whites, room temperature
  • 2 tablespoons sugar


    1. Butter eight 3/4-cup soufflé dishes; sprinkle with sugar, tilting cups to coat completely and tapping out any excess. Arrange prepared soufflé dishes on large baking sheet.
    2. Combine chocolate and cream in large metal bowl. Set bowl over saucepan of barely simmering water and stir until chocolate is melted and mixture is smooth. Remove bowl from over water.
    3.  Stir egg yolks and salt into chocolate mixture. 
    4. Using electric mixer, beat egg whites in another large bowl until soft peaks form. Gradually add 2 tablespoons sugar, beating until semi-firm peaks form. 
    5. Using rubber spatula, fold 1/4 of beaten egg whites into chocolate mixture to lighten. Fold remaining egg whites into chocolate mixture in 2 additions. 
    6. Divide chocolate mixture among prepared soufflé dishes, filling dishes completely.
    7. Bake in a preheat oven of 180 C for 15 minute, at room temperature and 18 minutes if chilled or until the top feels firm and soufflé puffs up.
    8. Serve immediately with custard/ice cream/whipped cream.


    Thursday, November 22, 2012

    Facebook Page

    A little bit of myself before I get to the point.

    I started baking at the age of 8. I know I should have been playing with my cooking toys or barbie dolls at that age but no I fell in love with the real thing. Mum never believed in my passion and love for baking at that time; I can't blame her for that. She would've thought I was fooling around. But my dad ,on the other hand, was the complete opposite. At the age of 10, he bought me a set of hand held mixers (which I insisted I wanted when I saw it at the electrical shop) because he realised I struggled beating the butter and sugar with a wooden spoon. And the journey began. 13 years down the road I am still using that very hand held mixer dad bought for me. I bought myself a stand mixer three years ago which I use as well. I can't wait till dad gets me a kitchenaid. I hope to take a diploma in pastry from Le Cordon Bleu in Paris in the next few years and open a dessert boutique & bar in the future. Hope all goes well. :)

    At the moment, to give myself an excuse to bake and improve ( secretly,to get extra pocket money too! =P ) myself, I've decided to take orders for my cakes,cupcakes & cookies only. Prices will vary.

    I started blogging my food journey only recently,maybe a year or so and started taking photographs as well. I am still learning and still not very good at it but I hope to get better as time goes. I post my pride and joy on my personal facebook page which I got a fair share of good and 'sarcastic' comments. Good comments have encouraged me to continue my baking and photography skills while the sarcastic ones have made me realised that there are friends who will definitely be envious and want to discourage me from doing what I love so I decided to created a facebook page for My.Vanilla.Sprinkles to share my pride and joy with everyone who support me!

    Please support me by liking my facebook page! Thank you!!:)


    Friday, November 16, 2012

    Happy Deepavali (Diwali)!!!

    HAPPY DEEPAVALI (DIWALI) !!!


    I finally got to celebrate deepavali after being away for 5 years. One thing wonderful about living in Malaysia, the country is multiracial and there are so many festivals to celebrate. While I was away in Sydney, you hardly feel the festive seasons like Eid, CNY & Deepavali. It's just another day in a foreign land. 

    Just a quick update on my blog which I have been neglecting because I have been so lazy to blog.

    I started a new job if I haven't mentioned it already here. I have join a Management Training Programme like sponsored by Maybank. I'm having an amazing time with amazing friends and people in FSTEP. 

    Since I started my training, I only had the weekends to bake my cookies and cakes so last Saturday was a mad day for me. I baked 5 different types of cookies in one day, it took me 15 hours to complete everything because there was a power supply cut for 3 hours. It was a frustrating 3 hours of waiting.Still I manage to cut my fruits and nuts for my sugee christmas cake for next year! 

    On Sunday, I baked one caramel cake which was a flop because I didn't bake it long enough as I was forced turn off the oven and attend an open house. Then I made macarons which was a flop as well. I almost broke down and wanted to give up. Batches of macaron batter were thrown out. I made my macarons twice and both were a flop, can you imagine? sigh... I never gave up and continued with my mini pear cupcakes. That,at least, turned out well. Made the buttercream for it, tried to savage a few of my macarons and fill them with raspberry buttercream then kept the remaining buttercream in the fridge for piping the next day. 

    On Monday, I got the courage to make my caramel cake again and this time I baked it longer. Final results were out of this world. I reassured myself Sunday was a jinxed day for me! I had to make myself happy lah!

    No recipes in this post because I didn't get to take individual pictures of my cookies & cakes. 


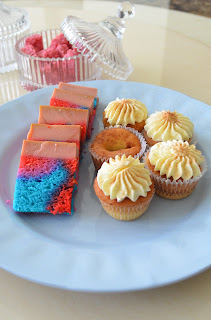
    Clockwise : coconut candy, caramel rainbow cake & mini pear cupcakes with  swiss buttercream dusted with cinnamon-vanilla powdered sugar, sugee (semolina) cornflakes cookies, pineapple jam tarts, cashewnut cookies, vanilla-orange semperit cookies, coffee-chocolate cookies coated in nestum.


    Chocolate macarons with Caramel buttercream

    I tried a different macaron recipe for a change because I find Italian meringue tricky to make. It works wonderfully sometimes for me and sometimes it turns out to be a disaster.So I tried looking for a different recipe and found a recipe off Kak Rima's blog  and this recipe uses the swiss meringue method. She had another one using the French meringue method but I chose this. Will definitely try the french meringue method as well soon.

    So what did I think of the making  macarons using the Swiss meringue method?
    I found it easier to handle compared to the italian meringue method. Kak Rima's recipe turned out fantastic. The most successful batch of macarons for me so far.


    Makes ~ 30 filled macarons

    Chocolate macaron recipe:
    180g  egg whites
    160g caster sugar

    180g sifted almond meal
    180g icing sugar,sifted
    20g dutch processed cocoa powder, sifted
    1. Prepare baking trays with parchment paper or silpat with macaron template sheet underneath.
    2. Preheat oven to 160 Celcius.
    3. Mix egg whites and caster in a bowl and place the bowl over a pot of simmering water(double boiler method) until sugar is melted and the mixture is really hot. Make sure you continuously stir the mixture. Temperature approx 50-55 Celcius.
    4. Remove from heat and using a stand mixer or hand held mixer, whisk mixture until medium peaks and slightly cooled down. Don't over beat the mixture. If you have accidentally over beat the mixture, you will have to throw it away and start all over again. (Speaking from experience. LOL!!)
    5. Mix the sifted almond meal,icing sugar and cocoa powder in a different bowl. Take a scoop of meringue and mix vigorously with the dry ingredients. Fold gently until combined the rest of the meringue in two batches.Make sure you have a shiny, glossy & slightly thicker than cake batter mixture.
    6. Scoop mixture in a disposable piping bag fitted with a 10mm plain nozzle. Pipe according to your macaron template and rap baking tray on a hard surface. Allow the surface of macaron to dry completely before baking it on the lowest rack for 15-20 minutes opening the oven door once during baking time.
    7. Allow to cool before removing macaron shells. Match the shells for piping.

    Allowing my macaron shells to form a skin under the air conditioner

    Almost perfect after baking!
    Caramel swiss meringue buttercream:
    50g egg whites
    90g caster sugar
    150g unsalted butter

    1 heaped tablespoon caramel, store bought or homemade ( will post a recipe in future )
    1. Mix egg whites and caster in a bowl and place the bowl over a pot of simmering water(double boiler method) until sugar is melted and the mixture is really hot. Make sure you continuously stir the mixture. Temperature approx 50-55 Celcius.
    2. Remove from heat and using a stand mixer or hand held mixer, whisk mixture until medium peaks and cooled down but not too cold.
    3. Add butter cubes gradually, making sure butter has fully incorporated after each addition. Add caramel and mix until combined.
    4. If your buttercream doesn't have a pliable consistency, put in the fridge for 15-30 minutes until it firms up a bit.  
    5. Scoop buttercream in a piping bag fitted with a plain nozzle.
    Assemble:
    1.  Pipe one macaron shell in each pair with buttercream then cover with the other macaron shell then twist the macarons slightly. Place in fridge for 24 hours to mature.
    Macaron shells were matched and piped with caramel buttercream
    Notes:
    • Air con dry it for 15-30 minutes.
    • Make sure meringue is glossy and shiny.
    • To prevent browning for coloured macaron shells, place an empty tray on the top shelf.
    • When baking, have another same size baking pan on the bottom on macarons' baking pan.


    viola~